Open topic with navigation
You are here » Adding Sage Exchange Desktop to Sage Exchange Portal > Configuring settings
Configuring Settings
Use the Sage Exchange Desktop - Settings dialog box to configure devices and other Sage Exchange Desktop settings. This dialog box consists of a tree on the left-hand side and settings on the right-hand side. The settings on the right-hand side change according to which node of the tree you have selected. The nodes available on the tree depend on the devices you have installed on your workstation. For example, the Check Devices node displays only if you have a check reader device installed on the workstation. Use the Data Exchange node if you want to configure Sage Exchange Desktop for use with Sage Exchange Portal.
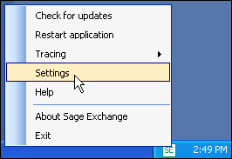
- Right-click the SE icon in the Microsoft Windows system tray then select Settings to open the Sage Exchange Desktop – Settings dialog box.
- Expand the Credit Card Devices node.
Note The Check Devices node displays only if you are using a check reader device. Additionally, you must configure the Data Exchange node only if you are using Sage Exchange Portal. Visit the Self Service Portal for additional information about Sage Exchange Portal.
- Mark the check box for the type of credit card reader that is attached to your workstation:
- Magensa Card Swipe (Recommended) – Select this option if you are using a Magtek card reader. This card reader is black and is encrypted for Sage Payment Solutions.
- Generic Keyboard Card Swipe - Select this option for card readers that are compatible with most Sage software-integrated products. This card reader is generally off-white, is not encrypted, and can be attached to a computer keyboard.
- Ingenico iPP320 or Ingenico 3070 - These terminals can process debit and credit card transactions. They are used primarily by Canadian merchants. If you mark either of these devices, you must also install additional software drivers. The front-end network should be set to PNS Canada PIN Debit. Sage Exchange Desktop automatically restarts when you select the iPP320.
Note Download and review the Sage Payment Solutions Ingenico iPP320 Setup Guide before installing your Ingenico iPP320 device.
- Optionally, mark Automatically start card swipe if you want the device to automatically prompt you for the card-reading interface if you will be swiping credit cards for most transactions.
- Click OK to accept your selections and to close the Sage Exchange - Settings dialog box.
- Right-click the SE icon then select Restart application if you marked Automatically start card swipe to fully enable the functionality.
Configuring Sage Exchange Desktop for use with Sage Exchange Portal
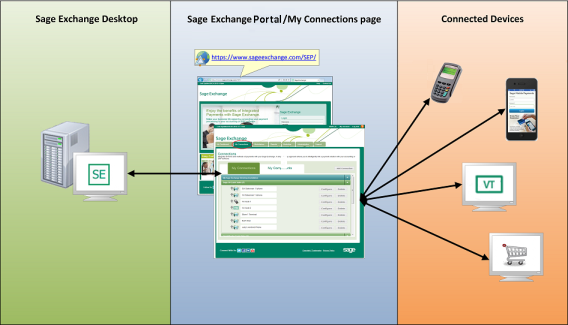
Sage Exchange Desktop serves as the connection point between your accounting application and ; therefore, you must install and configure it if you want to use Sage Exchange Portal.
Note See the Sage Exchange Desktop - User Guide in the Self Service Portal for additional information about installing Sage Exchange Desktop.
After installing Sage Exchange Desktop, you must configure it for use with Sage Exchange Portal. The configuration process consists of:
- Registering (or pairing) your Sage Exchange Desktop installation in Sage Exchange Portal.
- Installing and enabling a . You must install the plugin that corresponds to the application you want to use with Sage Exchange Portal.
- Configuring the plugin by selecting the general ledger (GL) accounts you want to make available on the Configuration page in Sage Exchange Portal when adding a connection.
- Using the My Connections page in Sage Exchange Portal to connect your accounting application (via Sage Exchange Desktop) to Sage Exchange Portal.
After completing the steps listed above, you can connect devices such as credit card swipers, check readers, workstations running Virtual Terminal, shopping cart web pages, and mobile devices running to Sage Exchange Portal.
Note See the Sage Exchange Portal - User Guide in the Self Service Portal for additional information about adding components and connections in Sage Exchange Portal.
Click  here to display an image of how Sage Exchange Desktop and payment devices are connected to the My Connections page in Sage Exchange Portal.
Registering Sage Exchange Desktop in Sage Exchange Portal
Follow the steps below to register your Sage Exchange Desktop installation in Sage Exchange Portal.
-
Go to https://www.sageexchange.com to access Sage Exchange Portal then enter your login credentials in the User Name and Password fields.
-
Click the My Connections tab to open the My Connections page.
-
Click the My Components tab to open the My Components page.
-
Click Add Component to open the Pairing page, where Sage Exchange Portal initiates the pairing process and creates an access code for the component:
- Copy the access code to the Microsoft Windows Clipboard then minimize the Sage Exchange Portal window. See step 5.
- Click Email Access Code to send the access code in an e‐mail message. This allows you to send the access code to a different user or location if needed.
- Save (or e‐mail) the access code then click Pair Later to add the component now then complete the pairing process at a later time.
Note If you cancel or choose to complete the pairing process later, Sage Exchange Portal lists the component type as Pending Component on the My Components page. You complete the process by entering the access code in Sage Exchange Desktop settings. Sage Exchange Portal will recognize when the process in complete then automatically update the component status.
- Right-click the SE icon running in the Microsoft Windows system tray then select Settings to open the Sage Exchange – Settings dialog box.
- Expand the Data Exchange node then click Register to open the Register panel.
- Enter (or paste) the access codes you generated in Sage Exchange Portal in the Access Token field.
- Click Sign In to complete the registration process and to add the Sage Exchange Desktop installation as a component in Sage Exchange Portal. Do not close the Sage Exchange – Settings dialog box.
Installing, enabling, and configuring plugins
This section includes a procedure for each available plugin in Sage Exchange Desktop. After installing your accounting application, Sage Exchange Desktop, and registering Sage Exchange Desktop in Sage Exchange Portal, follow the procedure for the plugin that corresponds to your application.
Understanding postback
Cash sales and invoice payment connections generate transactions from Sage Exchange Portal. If you are installing and configuring the Sage 50 Accounting plugin, the posting method you selected for your company determines how Sage Accounting handles postback transactions:
- Real Time ‐ Transactions that users enter (then save) in Sage Exchange Portal connected applications immediately post to the designated general ledger accounts in the accounting application.
- Batch ‐ Transactions are saved as a batch that you must manually post in Sage Accounting. Using this method, you review the batch of transactions then choose the journals to which you want to post the transactions on the Post dialog box (Tasks > System > Post).
- SmartPosting (recommended) ‐ Available only to Sage Quantum Accounting companies, SmartPosting is a service that automatically searches the accounting application’s database at regular intervals for saved transactions to post to the general ledger accounts.
Note After you install and configure plugins, the next step is to add a connection in Sage Exchange Portal. The connection configuration process allows you to choose the Sage Accounting general ledger accounts to which you want to post transactions. Additionally, if you are installing a plugin on a multi‐user workstation, we recommend installing it for only one user (typically the system administrator). This will prevent other users from accessing the general ledger accounts.
- Open Sage 50 and connect to the company you want to use with Sage Exchange Desktop. Minimize the Sage 50 window but keep the application open.
- Restore the Sage Exchange Desktop – Settings dialog box then expand the Data Exchange node.
- Click Get Plugins to search for available plugins.
- Click Install for the selected Sage 50 plugin.
- Click My Plugins to view your installed plugin.
- Click Enable to enable the plugin.
- Click Options to open the Sage 50 dialog box.
-
Click the Please select your company link to open the Company dialog box.
-
Select the company you want to connect to in the Company field then click OK. Sage Exchange Desktop may display an error message. If so, click OK to close the error then click OK to close the Sage 50 dialog box.
Note Sage Exchange Desktop can connect to only one company. Additionally, you cannot change the company selection.
- Restore the Sage 50 window, where the Third Party Application Access dialog box displays.
-
Mark Always allow access then click OK to close the Third Party Application Access dialog box.
-
Optionally, select Maintain > Company Information > Posting Method to open the Posting Method dialog box, where you can verify (or change) the selected posting method.
- Close Sage 50 then restore the Sage Exchange Desktop – Settings dialog box.
- Click the My Plugins node.
-
Click Options to open the Sage 50 dialog box.
-
Click the general ledger journal you want to work with in the left‐hand pane. Sage Exchange Desktop populates the right‐hand pane with the general ledger numbers in the selected journal.
- Mark the Account ID column for each general ledger account you want to make available for selection when adding a connection in Sage Exchange Portal. Optionally, enter a keyword in the Search for field to filter the general ledger accounts.
-
Click OK to accept your selections and to close the Sage 50 dialog box.
- Click OK to close the Sage Exchange – Settings dialog box.
Note When using the QuickBooks plugin, you must always close Sage Exchange Desktop before closing QuickBooks.
- Go to http://www.sageexchange.com/install/QB11.ZIP and install the QuickBooks SDK.
- Open the Sage Exchange Desktop ‐ Settings dialog box then expand the Data Exchange node.
- Click Get Plugins to search for available plugins.
- Click Install to install the QuickBooks Cash Sales plugin.
- Click My Plugins to view the installed plugin.
- Click Enable to enable the QuickBooks Cash Sales plugin.
- Open QuickBooks and connect to the company you want to use with Sage Exchange Desktop. Minimize the QuickBooks window but keep the application open.
- Restore the Sage Exchange Desktop Settings dialog box then click Options to open the Options dialog box for the QuickBooks Cash Sales plugin.
- Click Company to open the Company dialog box.
- Minimize the Sage Exchange Desktop ‐ Settings dialog box and restore the QuickBooks window displaying the QuickBooks ‐ Application Certificate dialog box.
- Mark Yes, always allow access even if QuickBooks is not running then click Continue.
- Restore the Sage Exchange Desktop Settings dialog box then click Browse on the Company dialog box to open the Browse for Company dialog box, where you must locate the QuickBooks company you want to connect to
-
Sage Exchange Desktop then click OK.
Note Sage Exchange Desktop can connect to only one company. Additionally, you cannot change the company selection at a later time.
- Mark the Account ID column for each general ledger account number you want to make available on the Configuration page in Sage Exchange Portal. Optionally, enter a keyword in the Search for field to filter the general ledger account list.
- Click OK to accept your selections and to close the Options dialog box.
- Click OK to close the Sage Exchange ‐ Settings dialog box.
- Close QuickBooks.
Connecting your accounting application to Sage Exchange Portal
After configuring the plugin for your accounting application, you must add a connection to it in Sage Exchange Portal. Follow the procedure below to add a connection to Sage Exchange Portal.
- Go to https://www.sageexchange.com to access Sage Exchange Portal then enter your login credentials in the User Name and Password fields.
- Click the My Connections tab to open the My Connections page.
- Click Add Connection to open step 1 of the connection wizard on the Connections page.
- Select the Sage Exchange Desktop component you registered in Sage Exchange Portal.
- Click Next to proceed to step 2.
- Select the plugin to which you want to connect.
- Select the type of plugin in the Function column.
- Click Next to proceed to step 3.
- Select the appropriate general ledger account numbers and settings for each account.
Note The configuration fields vary depending on the selected plugin and data connection. If a general ledger account number is not listed in a field, open Sage Exchange Desktop and review the selected general ledger account numbers for the plugin.
- Click Next to establish the connection and to return to the My Connections page, where the new connection listed.
Viewing transactions in your accounting application
The type of connection you added to Sage Exchange Portal determines which general ledger account you must open in your accounting application to view postback transactions:
- Cash Sales connections ‐ Open your accounting application and view transactions for the general ledger account you selected in the Total Account field within step 3 of adding a connection in Sage Exchange Portal.
Note If you selected the Batch posting method for your Sage Accounting company, cash sales postback transactions do not display in the general ledger account until after batch settlement.
When you use Sage Mobile Payments to process a credit card sale (non‐invoice), Sage Mobile Payments will create a corresponding transaction in Sage Accounting for the selected general ledger account. However, if you process a cash sale, Sage Mobile Payments will not create a corresponding transaction in Sage Accounting. You must manually record the transaction in Sage Accounting for the general ledger account.
Note Press History in Sage Mobile Payments to review a record of the cash sales you need to enter in Sage Accounting. Additionally, you can log on to My Sage Mobile to view your cash transactions.
- Invoice Payment connections ‐ When you process an invoice payment, Sage Payment Solutions immediately creates a receipt in the general ledger account you selected in the Cash Account field within step 3 of adding a connection in Sage Exchange Portal. To view the receipt, open your accounting application and view a list of receipts or open the invoice to which the payment was applied to view the updated balance.
Disabling a plugin
You can disconnect your accounting application (and all connected devices) from Sage Exchange Portal by disabling the corresponding plugin. Follow the procedure below to disable a plugin.
- Right-click the SE icon running in the Microsoft Windows system tray then select Settings to open the Sage Exchange – Settings dialog box.
- Expand the Data Exchange node.
- Click My Plugins to view your installed plugins.
- Click Disable for the plugin you want to disable.
- Click OK to accept your changes and to close the Sage Exchange – Settings dialog box.

 How to configure the Credit Card Devices node: